Posts in Sustainability
Repainting & Rewiring a Vintage Halogen Lamp for LED
Lamp turned on at night shows the blue glass edging.
Original halogen lamp.
Lamp rewired for LED and repainted in blue.

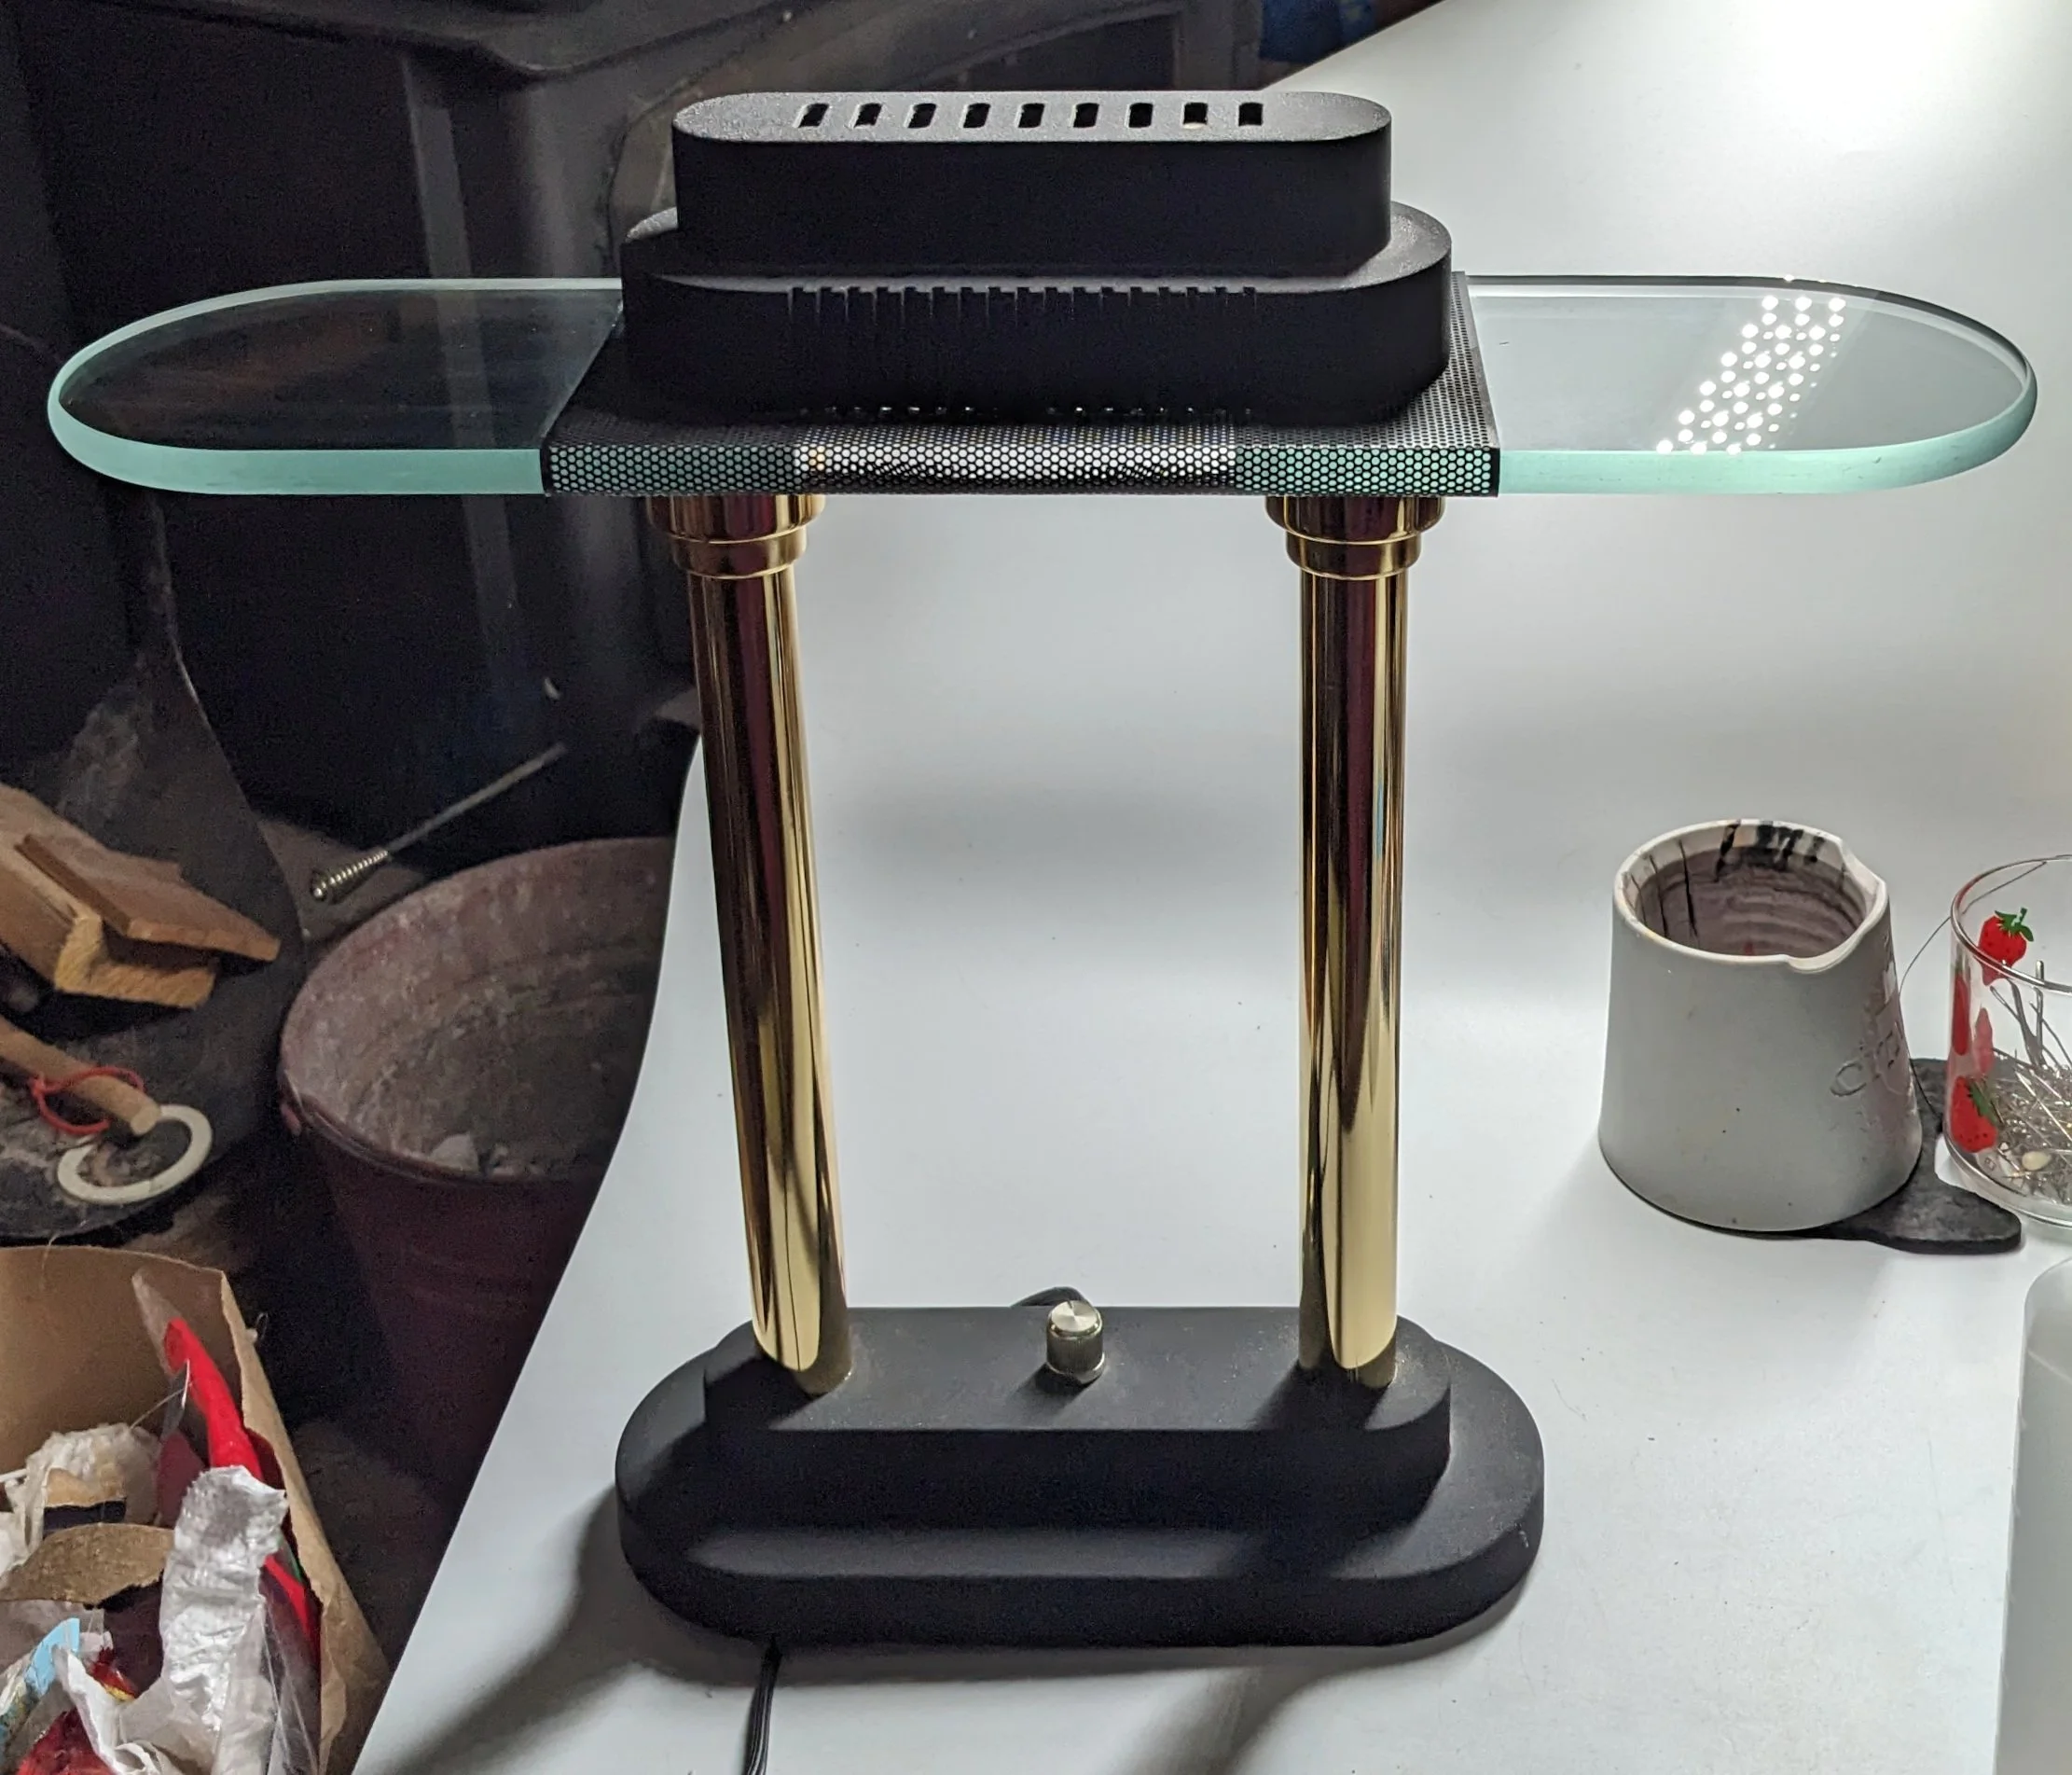
I grabbed this lamp at a thrift store because I knew they were worth a little bit of money and I could potentially resell it after fixing the wiring. This 90’s/banker’s lamp/art deco design is fun! But, I also wondered if changing the color of the black lamp parts to something more colorful might bring some life into it.

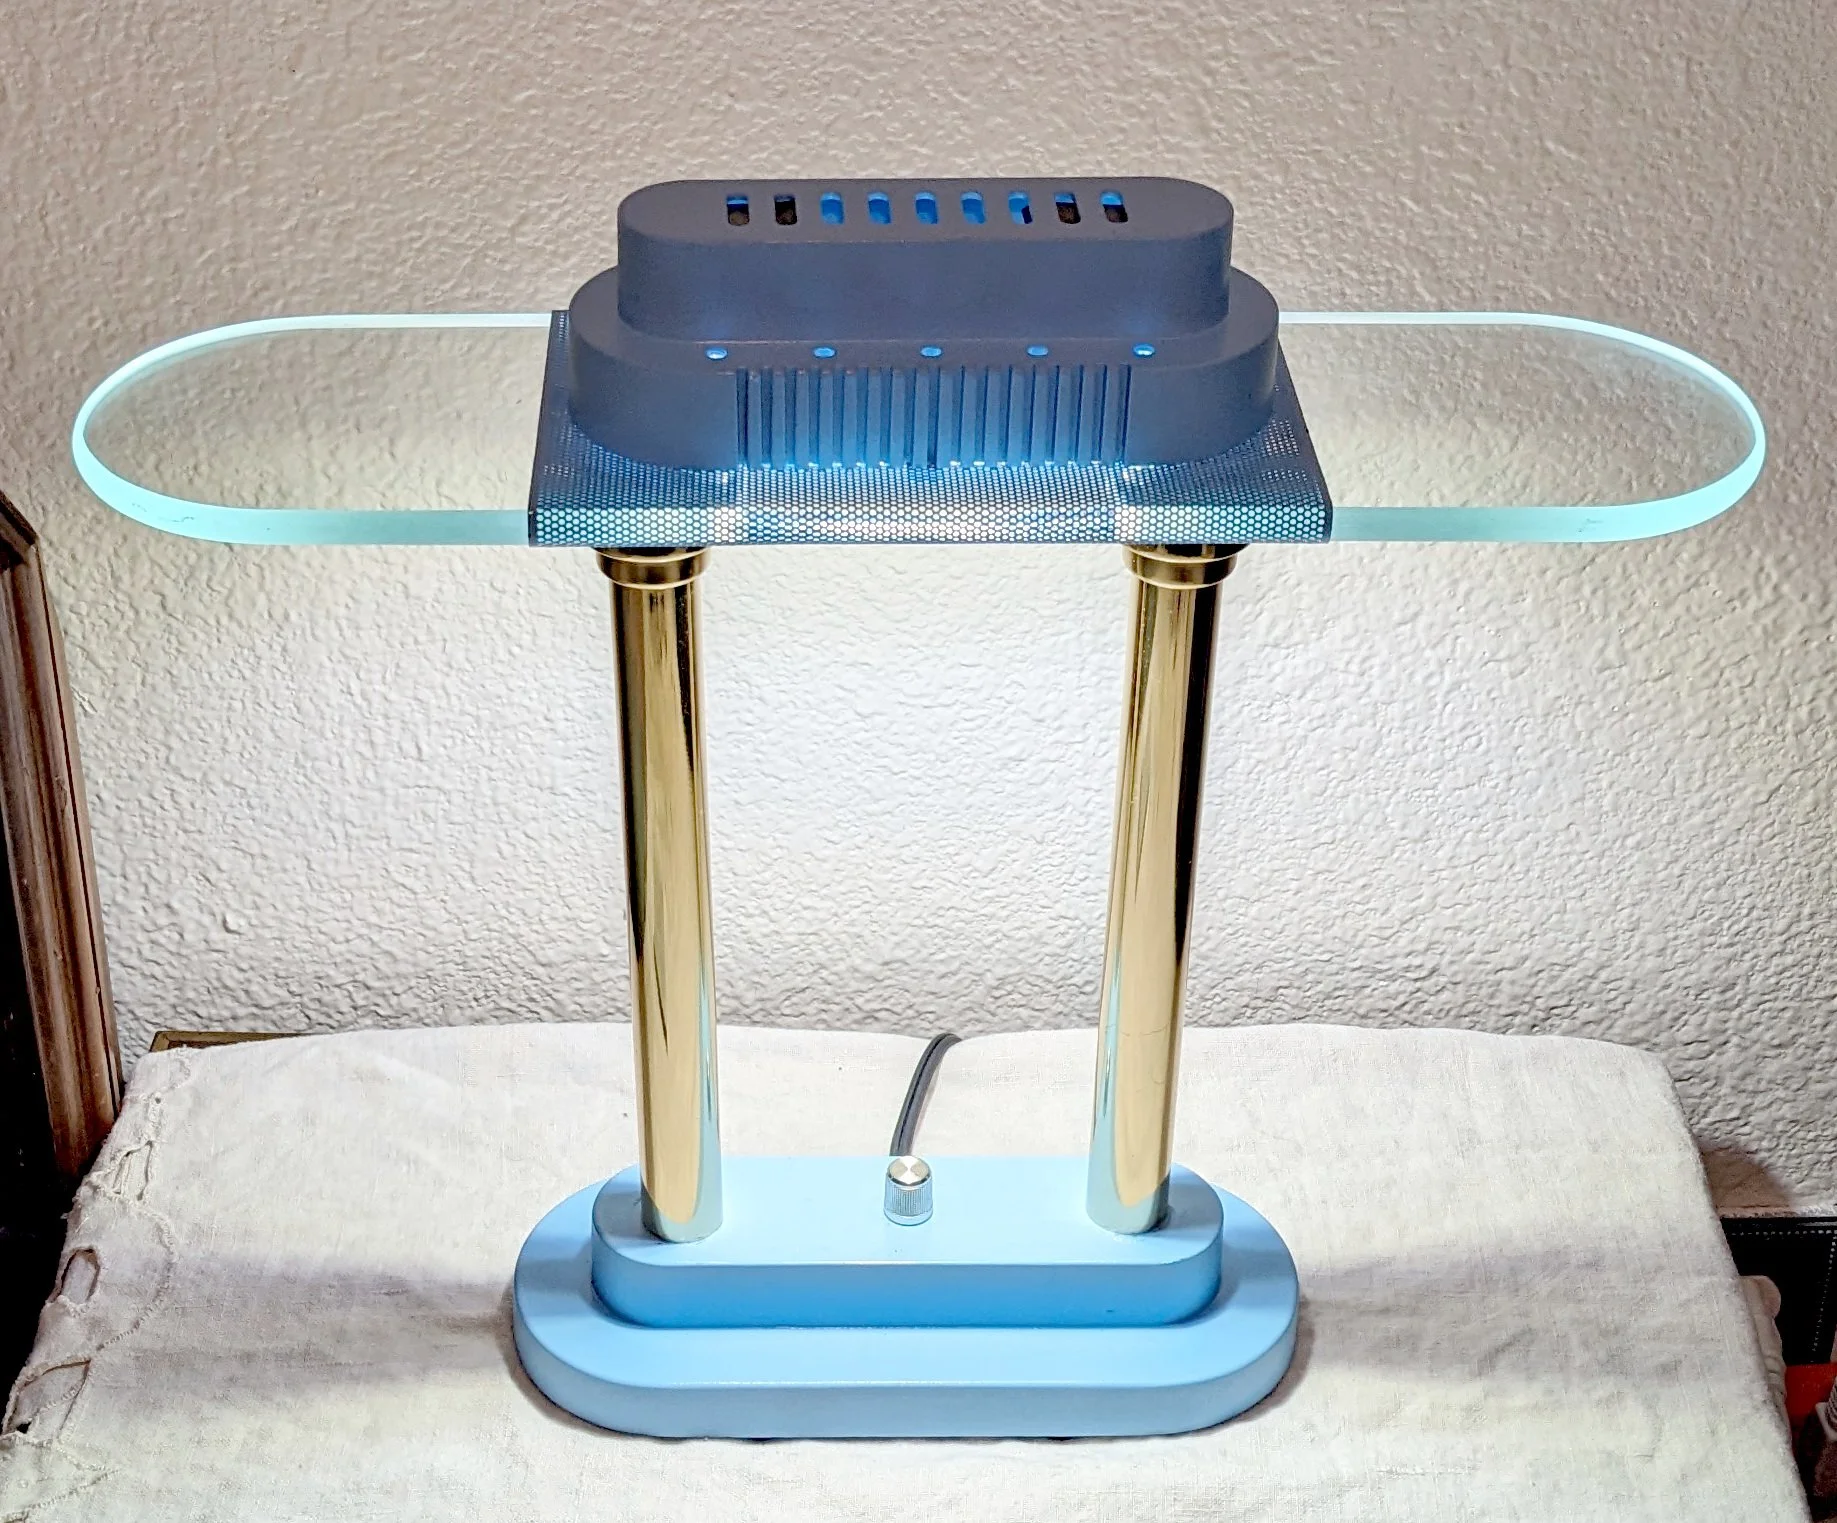
I spent some time looking at spray paint color options and was hovering around pale pink or blue because I love 80s colors. Ultimately I chose Rustoleum Gloss Harbor Blue because it had slightly more color saturation than a pale baby blue.

After realizing how hot the halogen bulb got in such a short time I decided to swap it out for an LED version. Not knowing much about halogen lightbulb sizes it took me some time to find the right replacement but anytime I can find an LED replacement I will swap old lightbulbs out for energy savings and safety.

The wiring on this guy wasn’t too complicated, just a dimmer switch in line with the power cord. When I am not sure if I will remember the wiring setup, I just take photos as I take a lamp apart and then go backwards through the photos to put it all back together.

Underside of lamp showing wiring to power cord and dimmer switch.
Under side of halogen lamp fixture.

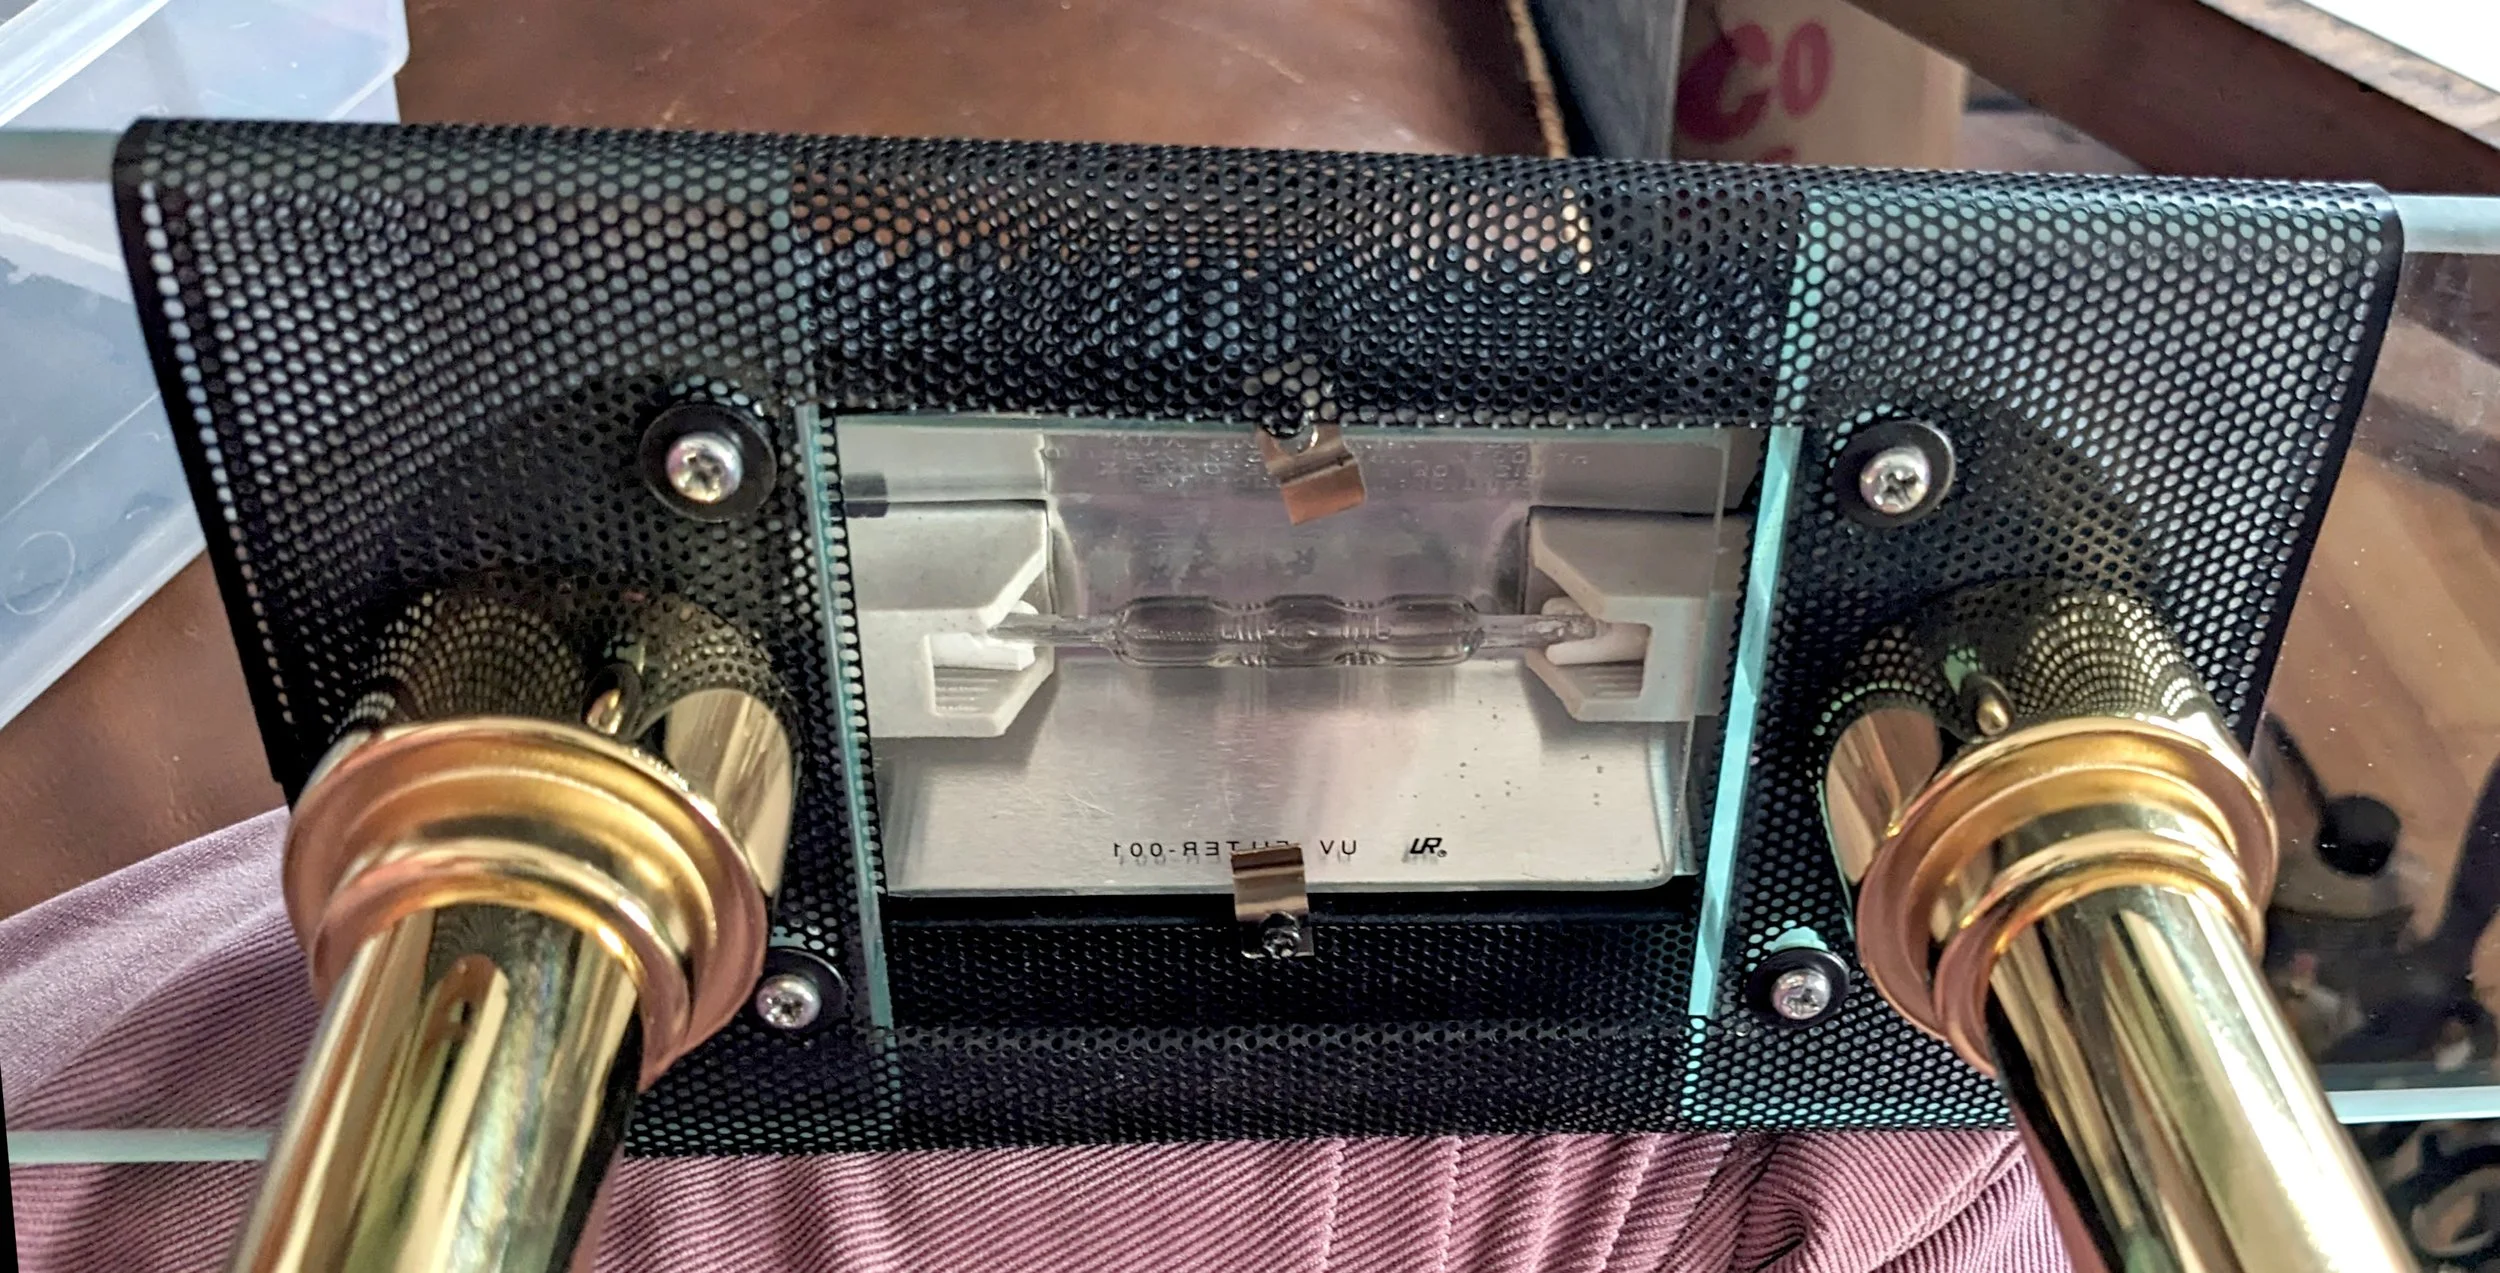
I had to splice and solder in in some additional length of wire coming from the halogen bulb fixture and then also do the same for the power cord to the bulb and dimmer. The original wiring used permanent clamps that I had to cut off to get the lamp apart for cleaning and rewiring. Luckily I really enjoy the splicing / soldering / heat shrink tubing application process.

In the end after cleaning and repainting the black parts, putting the lamp back together, and turning it on in the darkness I noticed the color of the glass even more (a light green) and the blue and green colors really worked together. Overall the style of this ended up looking very art deco /cyberpunk / 80s so I’m super happy!

Starting indoor seeds
Photo of seeds planted into paper pots with cardboard labels under an LED grow light.

Seeds planted into paper pots with cardboard labels under an LED grow light.

Photo of seed packets and extra seeds sorted into pill organizers

Empty seed packets and extra seeds sorted into pill organizers.

I am a little late getting started with some of these seeds indoors but am happy to have everything planted that needs some extra time. The main reason I am trying to plant more of our own food this year is that I am tired of plastic packaging and poor environmental practices of grocery stores and growers. Food has gotten more expensive and I’d rather spend that money investing in my own knowledge, learning how to grow food to save money and reduce my impact on the environment (perhaps even improving the environment a little?).

My current setup is a rolling tray with old baking trays as water catchers and an old broken clothing dryer as the light holder. The seeds are planted into rolled office paper tubes that have been folded in half and paperclipped together at the top. The labels are cut cardboard with sharpied names so I can just plant the whole thing when I’m ready and it will biodegrade. My extra seeds are stored in thrifted pill sorting containers (not my idea, but a good one!) The grow light is LED with white, red, and blue settings for different growth types, and the light is connected to a timer.

I’d like to have the indoor setup always growing greens because that is the one thing we consistently eat. Also no more hurrying to eat cut + packed lettuce!

Vintage Tangram Game Earrings Set
Colorful plastic tangram pieces that have been turned into earrings arranged on a flat surface.
Overhead photo of plastic tangram game pieces arranged in solved puzzle position. The pieces have been hole punched to turn them into earrings.
Plastic colorful tangram pieces turned into earrings arranged around the paper puzzle template.

I purchased these tangram puzzle pieces from an estate sale and even though they were not necessarily worth reselling as a puzzle they were definitely worth repurposing into jewelry! The colorful plastic pieces are partially neon and transparent, each with an interesting faceted surface. The light scratches and wear on the edges of the pieces (including tiny chips in the plastic) speaks to the age of the puzzle (maybe from the 80’s or 90’s based on the Hong Kong label?). They’re a cool set of interchangeable earrings that let you have 7!/(5!2!) = 21 unique pairings. The hooks and rings were purchased pre-owned from a church rummage sale and the hooks are a non-magnetic (I suspect it is brass) metal. Here’s to creative reuse! Now available in the eBay store.

DIY Table Lifts for Roomba Accessibility

I definitely recognize that this is a first world problem, but many of the used furniture pieces I buy are not Roomba accessible. This cute little (floral shaped?) table that I got for $10 at a garage sale has stabilization bars that prevent the robot vacuum from cleaning underneath it, so kitty floof and dust collects until I can get underneath there with a small broom.

To solve this I knew I wanted to raise the table, especially because it was already low to begin with. But I didn’t necessarily want to buy anything new to raise it up. I personally believe in reusing as many materials as we can to reduce our environmental impact. This goal also provides opportunities for creativity. For example, I spent several months keeping an eye out in the bins and estate sales for wood pieces that I could repurpose for this table. They didn’t even necessarily have to be table legs (I looked at four identical wood coaster holders in the bins and decided to pass). But, when we had to drive up to IKEA recently for a new mattress, I wanted to check the AS-IS section for anything we could potentially use for our house. This isn’t necessarily buying “used” but gets us farther away from buying new DIY supplies. In the parts and pieces section there appeared a set of 4 solid wood sofa legs being sold as a set for $5. I grabbed them thinking I could try them on the table and see if they fit.

After I opened the box I realized that the sofa legs (these ones) needed cutting to get them to be identical for a table, so I measured the diameter of the bottom of the table feet and did my best to try and match the size of where I cut the legs. Screws and other hardware also needed to be removed but that was fairly straightforward with my set of hex wrenches. I then sanded the cut edges.

To attach the legs I bored a hole in the bottom of each table leg and in the top of each IKEA leg and glued a dowel in between to connect them. I’m not sure if that is the official correct way to do this but I had extra dowels I purchased from an estate sale. The table legs did already have small holes from previous floor protector attachments so a few of the holes were off-center, resulting in a slightly wonky alignment of the bottom legs. Still, I like how it turned out! The table is kooky, definitely imperfect, made of reused materials, and still Roomba-friendly.

For this project I definitely needed patience, but reused items always show up eventually!

Gathering Small Scale Metal Recycling at Home
Box filled with various metal items gathered for scrap metal recycling.

Box filled with various metal recycling pieces in my garage.

I’ve been gathering metal recycling in its own bin and taking it down to the scrap yard for several years now. Most people know the scrap yard as a place you take old car bodies and washing machines, but I enjoy bringing my small household metals in there as well. There are a few reasons why I decide to collect my own household metals instead of putting the tin cans out on the curb and throwing away the rest. First, I can’t necessarily rely on curb recycling services to always recycle properly (instead of throwing all the recycling in the landfill because it has been contaminated with wish-cycled items like diapers). Second, my curbside recycling only accepts tin and aluminum cans - and I am definitely taking the aluminum cans into the Bottle Drop myself because they are worth a dime a piece in Oregon. Third, I like separating the valuable metals and seeing the metal sorting process at the scrap yard up close. Fourth and maybe most important, I am most interested in sustainability, waste streams, and reducing wasted materials in our everyday lives.

Some items that commonly go in my small metal recycling bin at home are: cut wires (I work in robotics), metal sheet cutoffs and ruined bolts (I do robotics and our home repairs), and electronic items (I resell on eBay and sometimes can’t fix electronics I find). Having a scrap metal bin at home is also nice because I can source things that I may need later for home or work projects. I also know that saving scrap metal is a common (and not new) practice for farmers and hobbyists. When I go to farm estate sales, the piles of old metal pipes and metal farm equipment show me that many people like to save metal pieces to do their own repairs. Metal is a valuable material that takes a lot of energy to make, and lasts awhile in the right storage conditions.

While I also could argue that saving scrap metal is worth the money, scrap metal is not worth enough right now for me to actively go out searching for it. When I do gather enough metal to bring in (maybe a large trash can’s worth) it is a nice but small monetary bonus of less than $10 if I don’t have any expensive metals like solid brass. Still, collecting small metal items at home lets me be mindful of what kinds of metal “trash” we would otherwise throw away and remove it before it goes to landfill. It is a nice exercise in sustainability mindfulness.

Visible (Ugly) Mending

A visible (ugly) repair on a beloved coffee mug.

Mending is usually a product of necessity for many of us who refuse to purchase a new item when the existing one “still works.” When I was younger I often associated this trait with grumpy old men who wanted to hold on to their dearly held tools or shoes and refused to buy into the new fashionable things they were supposed to buy. I should be clearer that when I was young I looked down on people that did this as stodgy weirdos who had poor taste. Note that I said I used to think this way. When I was young I bought into the idea that new is better and relished the high I would get purchasing a new item, going through items I didn’t want, and then giving those unwanted items to charity. Perhaps needless to say, my mind has changed significantly since those wasteful days. Not only do I have to be way more conscious of my money, and so therefore have to mend and fix items I use on a regular basis, I believe that environmentally and socially it is the right thing to do.

The image above is from a mug I got for free from a church rummage sale. I got it for free because I asked for a discount on the price because of the repair and the seller just said “take it.” The maker, Taylor & Ng, actually made several mugs in the 1970’s ago that resell for good money if they are not damaged. I noticed this one initially because of the Taylor & Ng signature but then also quickly realized that this mug has been messily mended using epoxy or some other permanent adhesive. Initially I thought that I could remove the adhesive and redo the mend to “look prettier” but after the adhesive survived through the dishwasher and the microwave I gave in and accepted the look for what it was - something that someone wanted to keep yet was not necessarily a expert repairer. Also, it was vintage and had a cat design, which is almost an instant keep for me.

The main lessons I take from this mug (and other things I have purchased in similar shape) are that (1) broken items are not necessarily unusable, (2) something doesn’t have to be pretty in the typical sense to be worth keeping and using, and (3) visible mending is an unexpectedly powerful way to portray a dedication to sustainability. The last point is poignant for me, especially because I’ve seen the trend of visible mending in recent fashion design. Visible mending speaks to our need to use less, reuse, and repair, in a very simple way. Purposely making, owning, and showing visibly mended objects is a persuasive action.